For this blogpost, I wanted us to go through sample roasting. How do we go about doing it? Well, let’s start with the basics.
What is a sample roast ?
Anything from 50-300 grams of coffee can be roasted on a sample roaster. It usually takes less time than a normal roast, because with such a small amount of beans, the roast development happens more quickly.
A normal sample roast for me is between 6-8 minutes.
We usually say that the roast has 3 different stages.
- Drying,
- browning
- development/roast
Drying
When you feed the coffee into the roaster, it is raw, with a 9-11.5% moisture content. This moisture has to evaporate before the actual roasting starts.
On our sample roaster, this stage takes about 3 minutes. And the drying stage normally ends at a temperature of 128-135 degrees celsius.
Our sample roaster is an open drum roaster, meaning that it is actually around 150/160 degrees celsius. But due to the probe placement, it show us lower numbers.
Browning/ Roasting
This is when the magic is starting to happen. The drying is finishing up, you can see a very clear colour change, and the aromas start to develop. And to me, it smells like toasted bread.
The coffee will go from a light greenish yellow, to a cinnamon-like colour, to brown.
It is the Maillard reaction that is responsible for browning. In Maillard reaction, reducing sugars and amino acids react making hundreds of different aroma and color compounds known as melanoids.
Development/ crack
When the drying phase is all done, and the coffee has soaked up as much energy and heat as possible, it will crack.
The gasses that are created inside the bean while heating are building up the pressure which eventually brittles & changes the cellular structure which then makes it possible for it to break.
The development/ crack usually lasts from 50 seconds to 1 minute.
In layman terms:
Coffee, green and raw, gets put into the roaster. And at this stage, the coffee has a moisture of about 9-11.5%. So the first part of the roast, is drying the coffee.
When this phase is done, slowly the coffee starts yellowing, then browning, until we are satisfied with the roast degree of the coffee. But it is not only roast degree, it is the development of the coffee that is important. Because, when you roast coffee, it`s kind of like popcorn. The coffee seeds expand almost 3 times in size, and they become soluble. Meaning, they can be mixed with water and drunk!
And in the scientific way,
The beans start out raw with around 9-11.5 % moisture in them. So the first part of the roast, is actually drying the coffee. When the moisture is all dried out, the actual roasting starts. You can see that by looking at the colour. It will go from yellow to brown.
The browning is actually where a lot of the magic happens. But, what else does it take? It depends on the machine you’re using to roast. As far as I am aware of, there are 2 main ways to roast:
Conduction and Convection.
And I am going to try my very best to explain this as easy as possible.
Conduction is a process where transfer of heat takes place between objects by direct contact.
Because the beans are in the drum. And getting direct contact with the hot drum. Leading the beans to be roasted. But, one downside with this way of roasting is if the drum is really hot, the profile is not long enough, or if you do not have enough motion in the beans, they end up being unevenly roasted!
And then we have radiation. Radiation basically refers to the heat that is transmitted without any physical contact between objects. Simply something being warm, and then the radiation from this warm object, heats up the stuff nearby.
Convection
Convection refers to the type of heat transfer where energy transfer occurs within a fluid, like air !
So imagine a drum, filled with beans with tons of hot air bursting through! Convection. It is the air heating up the coffee. Not the flaming hot drum.
Mildred
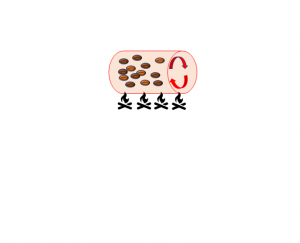
In our lab here in Oslo, we sample roast on a 4 barrel Probat BRZ. Her name is Mildred.
Which, if you are not familiar with sample roasters, looks like this:

And the way this machine works is both with Conduction and Radiation.
So, this one has a gas burner. So under the double walled drum, there is a line of fire. The drum is being heated up by this fire, making the drum warm.
We roast to buy and approve coffees that we want to buy. It is so important for us to have stabile profiles, so that we can give the all of the coffees a fair judgement. Because in the end, there is someone’s hard work behind all the beans. For us at Nordic Approach, it is important to roast light, but developed enough for the whole spectrum of the flavour profile to shine through. So the coffee can speak for itself. Let the good and the bad shine through.
Roasting Protocol
In order to create stability, and a good end product, we started implementing a roasting protocol. That means every single roast you do ( we do up to 200 a day), you have to register:
- Drop temp
- Yellow temp + time
- Browning temp + time
- 1 crack temp + time
- End of roast temp + time
And by registering all of this data, you end up with a history, that you can look back in, in order to know how to roast different samples.
Because, at the end of the day, you need to remember what you wanna do.
- Develop coffee – in the end , it’s just coffee after all
- Make it tasty – easy, buy delicious coffee
- Make sure to register what you do – make routines !
Sources/ links
- reducing sugars https://en.wikipedia.org/wiki/Reducing_sugar
- amino acids https://en.wikipedia.org/wiki/Amino_acid
0 Comments